

Your Lemonade is Ready!
You’ve built something amazing - now let’s put it to work! You can:- Email it – Chat with your AI right from your inbox (like having a helpful colleague on call 24/7)
- Add it to your website – Give visitors instant AI-powered help without them leaving your site
- Sell access – Turn your Lemonade into a business on your own domain with subscription billing
Accessing Deployment Options
1
Open Lemonade Editor
Navigate to Lemonades and click on your Lemonade
2
Go to Deploy Tab
Click the Deploy tab (Tab 7) in the editor
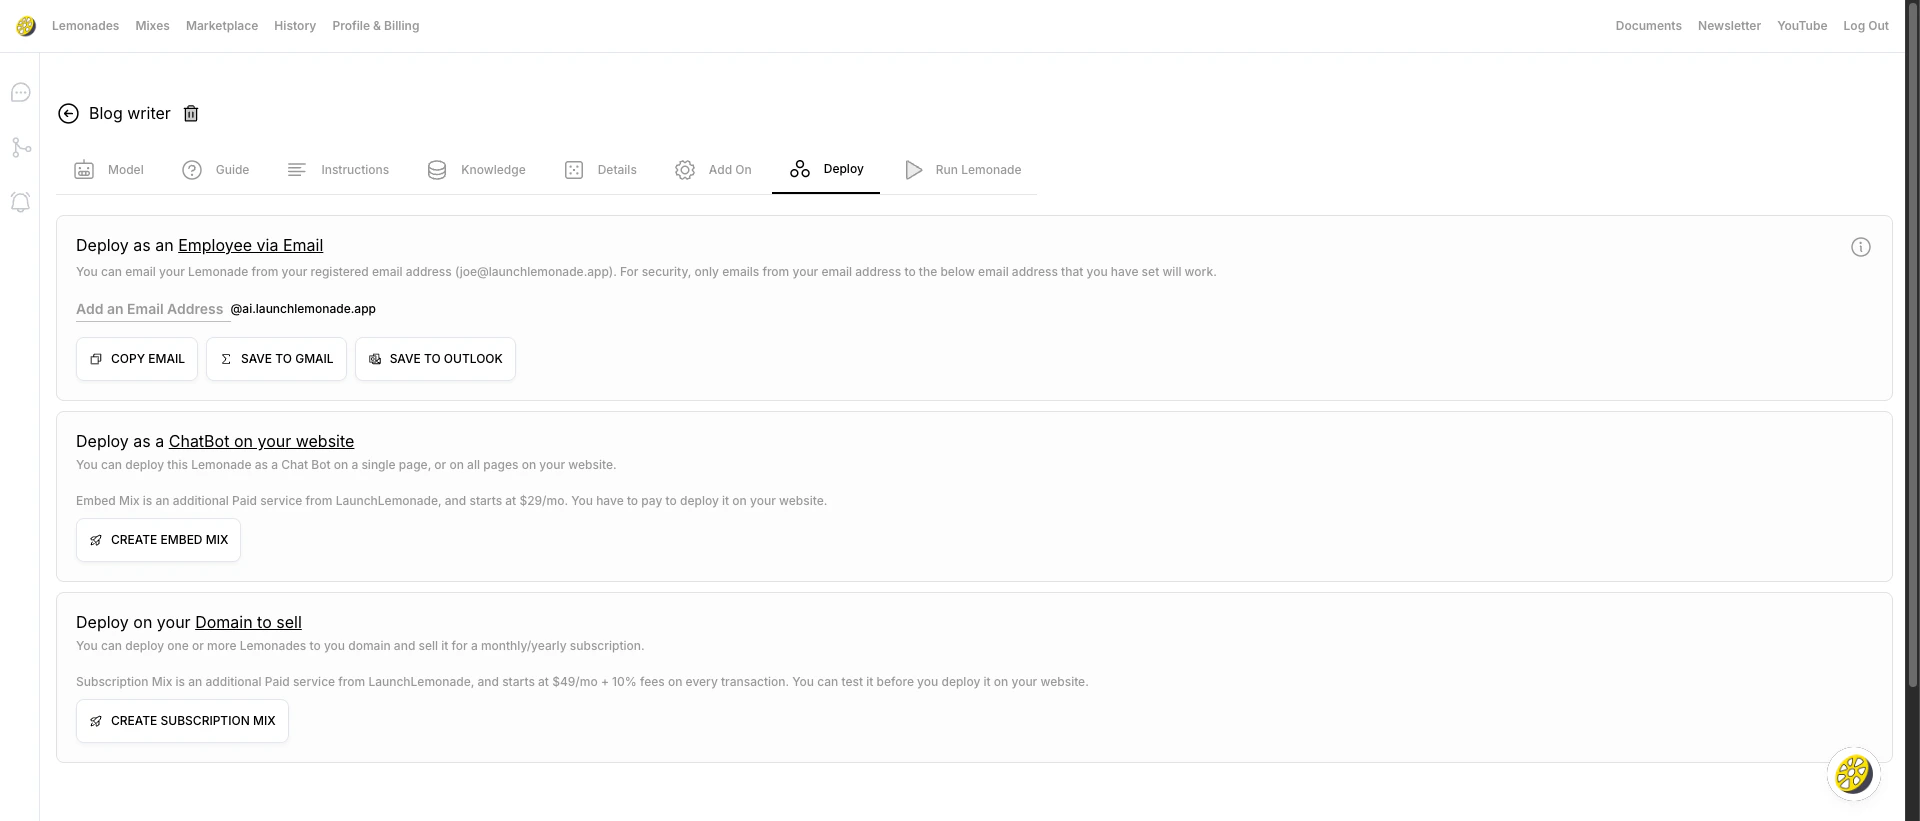
Option 1: Deploy as Email Employee
Imagine having an AI assistant you can email anytime - that’s exactly what this does. Set it up in under a minute!How It Works
- Your Lemonade gets a custom email:
yourname@ai.launchlemonade.app - You email questions to this address
- Your Lemonade responds via email
Setup Steps
1
Create Custom Email
Enter your desired email prefix (e.g.,
support, cto, assistant)2
Save the Email
Click COPY EMAIL, SAVE TO GMAIL, or SAVE TO OUTLOOK
3
Start Emailing
Send messages from your registered email address
Use Cases
Option 2: Website Chatbot (Embed Mix)
Add a chat widget to your website so visitors can interact with your Lemonade. Perfect for customer support, FAQs, or lead generation. Pricing: Contact usSetup Steps
1
Click Create Embed Mix
In the Deploy tab, click “CREATE EMBED MIX”
2
Configure Branding
Customize colors, logo, and widget appearance to match your site
3
Get Embed Code
Copy the JavaScript snippet provided
4
Add to Website
Paste the code before
</body> in your HTMLEmbed Code Example
Embed Code Example
Here’s what the embed code looks like (don’t worry, you just need to copy and paste it - no coding skills required):
Customization Options
Option 3: Domain & Monetization (Subscription Mix)
Ready to turn your Lemonade into a business? Sell access with subscription billing, custom domains, and user management. Pricing: Contact usWhat You Get
- Custom domain support (e.g.,
yourai.com) - Subscription management (monthly, yearly, or per-query)
- Payment processing via Stripe
- User management dashboard
- Analytics and usage tracking
Setup Steps
1
Click Create Subscription Mix
In the Deploy tab, click “CREATE SUBSCRIPTION MIX”
2
Configure Pricing
Set your subscription price and billing cycle
3
Set Up Domain
Connect your custom domain (optional but recommended)
4
Configure Payments
Connect your Stripe account to receive payments
5
Go Live
Test thoroughly, then publish and start selling!
Monetization Models
Comparison Chart
Best Practices
For Email Deployment
- Use descriptive email addresses (
support@ai.launchlemonade.appnotbot1@ai.launchlemonade.app) - Set up email filters to organize responses
- Include context in your emails for better responses
- Test it first by sending yourself a question!
For Website Embeds
- Match the widget to your brand colors so it feels native
- Write a compelling welcome message that tells visitors what your AI can help with
- Test on all device sizes (especially mobile!)
- Monitor chat analytics to see what questions people ask
For Monetization
- Start with competitive pricing - you can always raise it later
- Offer a free trial or demo so people can try before buying
- Provide excellent documentation for your subscribers
- Monitor user feedback and iterate based on what they need
Troubleshooting
Email Not Working
- Verify you’re sending from your registered email address
- Check spam folders for responses (add the AI address to contacts)
- Ensure the Lemonade is active in your dashboard
- Try sending a simple test question
Embed Not Showing
- Verify the script is placed before
</body>tag - Check browser console for JavaScript errors (press F12)
- Ensure no ad blockers are interfering
- Test in an incognito window
- Clear your browser cache
Payment Issues
- Verify Stripe account is properly connected
- Check currency settings match your region
- Test with Stripe test mode before going live
- Contact support for transaction disputes
What’s Next
Track Usage in History
Monitor all conversations with your deployed Lemonade
Explore Whitelabelling
Learn more about Mixes and customization options